Mastering NestJS: Your Ultimate Guide to Modern Backend Development
August 23, 2023 · 6 min read · Lire en français
Contents
Introduction
Welcome to this NestJS Series! Are you a developer searching for a powerful, efficient, and well-structured framework for creating scalable server-side applications? NestJS is the way to go! We'll walk you through the principles of NestJS, a modern, progressive Node.js framework that adds structure and maintainability to your backend projects, in this series of articles. By the end of this series, you'll have a good understanding of every facet of NestJS and be ready to confidently construct complex apps.
What is NestJS?
NestJS is a Node.js-based backend framework that includes best practices from a variety of programming paradigms, including Object-Oriented Programming (OOP), Functional Programming (FP), Reactive Programming, and others. It relies on TypeScript, a superset of JavaScript that allows for optional static typing as well as implementation and other advanced language capabilities.
NestJS's primary goals are modularity, re-usability, and testability. It enables developers to build clean, maintainable code by implementing a structured scheme for annoyance isolation. Anyone who has worked with the popular frontend framework Angular will know the framework.
Key Features of NestJS
- Modular Architecture
NestJS's applications are built using modules that encapsulate related functionality. This modular approach encourages code re-usability and simplifies - Controllers and Routes Controllers receive incoming requests and handle them by processing the incoming data and returning the appropriate responses. Routes are defined within controllers, making it easy to map URLs to specific actions.
- Providers and Dependency Injection
Providers are classes that can be injected into controllers, services, and other components. This enables the creation of loosely coupled and highly testable code. - Services
Services are responsible for business logic and can be shared across different parts of the application. They are injected into controllers and other services using dependency injection. - Middleware
Middleware functions can be used to process incoming requests before they reach the route handler. This is useful for tasks such as authentication, logging, and validation. - Interceptors
Interceptors are used to modify the request or response objects globally or for a specific route handler. They're great for tasks like data transformation and error handling. - Exception Filters
Exception filters handle exceptions that are thrown during request processing. They allow you to customize error responses and centralize error handling. - Pipes and Validation
Pipes are used to transform and validate data before it reaches the route handler. NestJS includes built-in validation mechanisms to ensure data integrity. - Guards
Guards are used to control access to routes based on certain conditions. They're commonly used for authentication and authorization purposes.
Setting Up a NestJS Project
To get started with NestJS, follow these steps:
- Install Node.js and npm
Ensure you have Node.js and npm (Node Package Manager) installed on your system. - Install Nest CLI
Install the Nest Command Line Interface globally using the following npm commandbashnpm i -g @nestjs/cli - Create a New Project
Use the Nest CLI to create a new NestJS project. Navigate to your desired directory and run the following commandbashnest new project-name - Explore the Project Structure
Once the project is created, explore the directory structure. You'll find modules, controllers, services, and other essential files organized for you. - Run the Application
Use the following command to start your NestJS applicationbashnpm run start
NestJS project structure
When you use the Nest CLI to create a new project, it generates a default project structure like this:
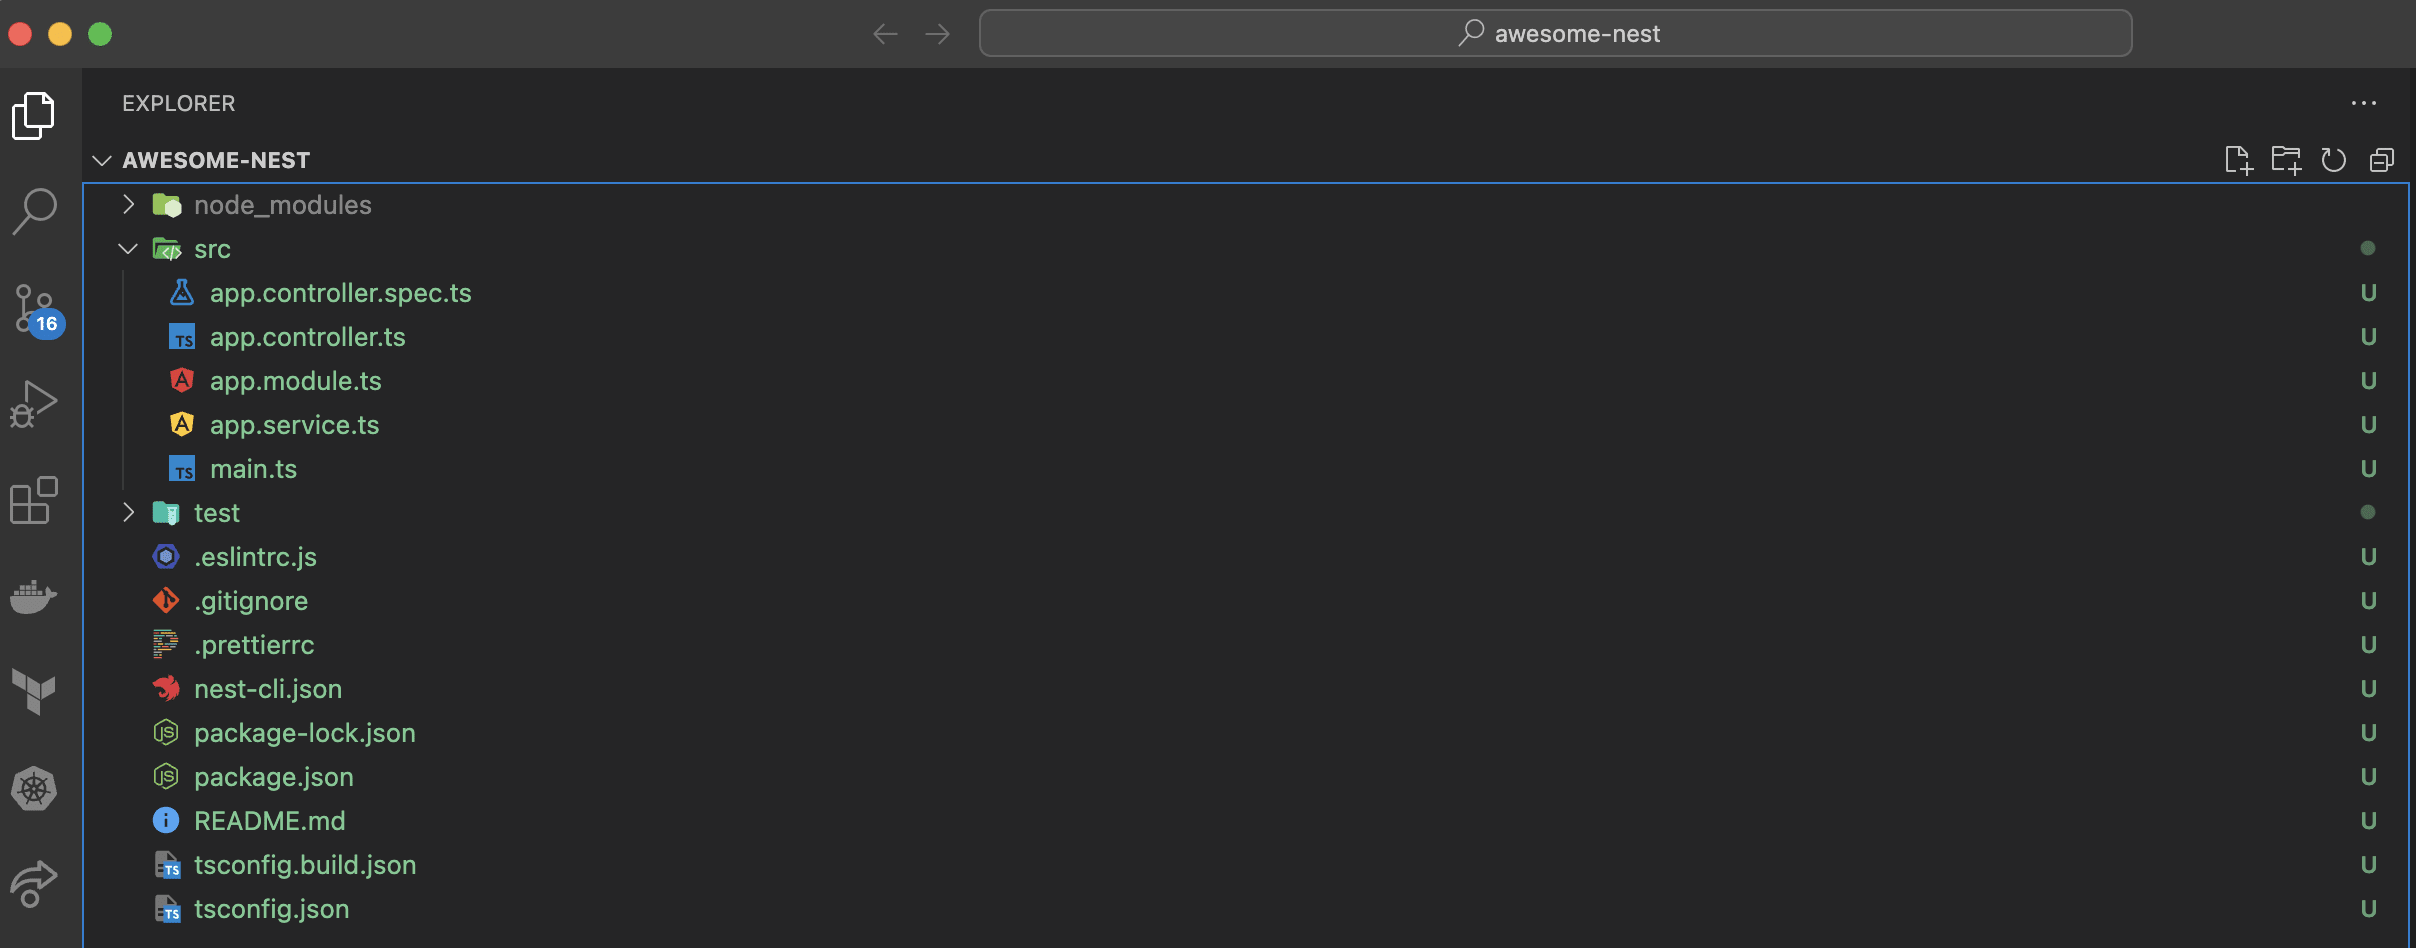
Let's take a closer look at each of these components:
- node_modules Directory: folder is where Node.js and npm store all the external dependencies required by your project. These dependencies include libraries, modules, and frameworks that provide additional functionality and features. You don't need to create or manage this folder manually—it's automatically generated and maintained by npm.
- src Directory: This directory contains your application's source code
- app.controller.spec.ts: contains a test suit that accompanies the app.controller.ts file. It's used to write unit tests for the actions provided by the AppController class.
- app.controller.ts: a sample controller that handles incoming requests and defines routes.
- app.module.ts: is considered as the root module of your application. It imports and coordinates other modules, controllers, and services.
- app.service.ts: a sample service that contains business logic. Services are responsible for handling the application's core features.
- main.ts: the entry point of your application. It initializes the Nest application and starts the server.
- test Directory: This directory is intended for unit tests. Note that, NestJS encourages a test-driven development approach.
- .eslint.js: Eslint configuration file
- .gitignore: used to specify files and directories that should be ignored by Git when tracking changes in a repository
- .prettierrc: Prettier configuration file
- nest-cli.json: The configuration file for the Nest CLI. You can define various options for your project here.
- package-lock.json: Used by Node.js to lock the versions of dependencies and their sub-dependencies, ensuring that the same versions are installed consistently across different environments. It's automatically generated by npm when you install, update, or remove packages
- package.json: The standard Node.js package configuration file. It lists the project's dependencies, scripts, and another metadata.
- tsconfig.build.json: Specifies configurations to use when building your Nest project.
- tsconfig.json: The TypeScript configuration file. It specifies how TypeScript should transpile your code.
Here we are. You know have a full description of a fresh NestJS project structure.
Next in the Series
In the upcoming articles in this NestJS Series, we will dive deep into each of the key features and concepts mentioned above. We'll explore how to create modules, define controllers and routes, work with providers and dependency injection, build robust services, implement middleware and interceptors, handle exceptions and validation, and secure your application using guards. By the end of this series, you'll have a comprehensive understanding of NestJS and be equipped to create powerful backend applications with ease.
Stay tuned for Part 2 of this NestJS Series, where we'll dive into the world of services, modules, and controllers!
Subscribe to future posts
Get future posts in your inbox. No spam, unsubscribe any time.
Related posts
Mastering NestJS: Unlocking the Power of Relationships with TypeORM and SQL Databases
Unlock the Power of Data Relationships with NestJS, TypeORM, and SQL Databases. Master the art of building complex data structures and seamless interactions. Ideal for both seasoned NestJS developers and beginners looking to create cutting-edge apps
October 18, 2023
Mastering NestJS: Connecting NestJs to PostgreSQL Database
Learn the Essential Steps to Master NestJS and Leverage TypeORM for Robust Database Connectivity in Your Projects.
September 6, 2023
Mastering NestJS: Understanding Services, Modules, and Controllers
Learn about the essential components of NestJS for building scalable server-side apps. Examine the functions of services, modules, and controllers while using the capabilities of DTOs (Data Transfer Objects) for data validation and increased security.
September 3, 2023