Mastering NestJS: Understanding Services, Modules, and Controllers
September 3, 2023 · 6 min read · Lire en français
Contents
Introduction
In a previous post, we introduced you to NestJS, a TypeScript-based modern framework based on Node.js that brings structure and efficiency to your backend projects. In this ongoing series, we'll dive deeper into NestJS's key features and concepts. You'll gain a comprehensive understanding of modules, controllers, routes, providers, services, exception handling, and validation through a project that will consist of implementing the CRUD (Create, Read, Update, Delete) of products from an e-commerce catalog.
I created a GitHub repo for this series accessible at the following address
CRUD resource
Since we're about to create a Product resource, the most straightforward way to handle this is to run a unique command that will generate a new CRUD resource resulting from a module, a controller to define CRUD routes, a service to implement & isolate business logic, an entity class/interface to represent the resource data shape, and DTOs to define how the data will be sent over the network,
Let's create our first CRUD resource the following cli command:
nest g resource products
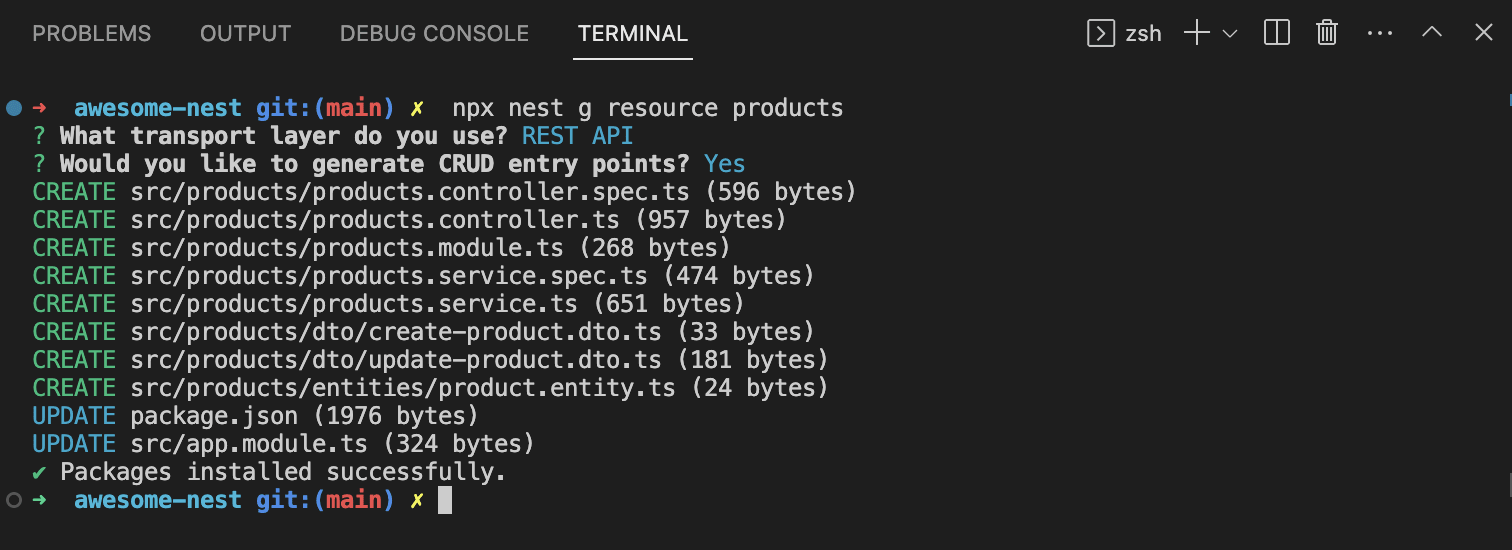
In the following screenshot, please notice that use REST API as transport layer and hint Y when asked if we would like to generate CRUD entry points
If everything goes well, you will notice that you have a new folder named products and that your app.module.ts file has also changed. Let's explore all this in the next sections.
Entity
The purpose of an Entity in NestJS is to define the structure and schema of your data models, primarily for database interactions. In a real-world project, this entity class will be manipulated through an ORM like Prisma, MikroORM, TypeORM ..., but at this state we're not going to dive in that.
Let me show you what the product entity looks like
export class Product {
  id: number;
  name: string;
  description: string;
  category: string;
  price: number;
  image: string;
}
Service
In a NestJS project, services enable you to separate your application's logic into reusable and testable units. This separation of concerns promotes code maintainability and makes it easier to collaborate on larger projects.
import { HttpException, HttpStatus, Injectable } from '@nestjs/common';
import { CreateProductDto } from './dto/create-product.dto';
import { UpdateProductDto } from './dto/update-product.dto';
import { Product } from './entities/product.entity';

@Injectable()
export class ProductsService {
  private lastProductId = 0;
  private products = [];

  create(createProductDto: CreateProductDto): Product {
    const newProduct = { id: ++this.lastProductId, ...createProductDto };
    this.products.push(newProduct);
    return newProduct;
  }

  findAll(): Product[] {
    return this.products;
  }

  findOne(id: number) {
    const product = this.products.find((product) => product.id === id);
    if (product) {
      return product;
    }
    throw new HttpException('Product not found', HttpStatus.NOT_FOUND);
  }

  update(id: number, updateProductDto: UpdateProductDto) {
    const productIndex = this.products.findIndex(
      (product) => product.id === id,
    );

    if (productIndex > -1) {
      this.products[productIndex] = updateProductDto;
      return updateProductDto;
    }
    throw new HttpException('Product not found', HttpStatus.NOT_FOUND);
  }

  remove(id: number) {
    const productIndex = this.products.findIndex(
      (product) => product.id === id,
    );

    if (productIndex > -1) {
      this.products.splice(productIndex, 1);
    }
    throw new HttpException('Product not found', HttpStatus.NOT_FOUND);
  }
}
Notice that our product service class implements the five CRUD methods which are:
- create: to create a new product resource
- findAll: to retrieve all products
- finOne: to retrieve one product by its ID
- update: to update a product resource
- delete: to delete a product
Data Transfer Objects
In essence, DTOs help control and validate data when creating or updating resources in a NestJS application, ensuring that the data adheres to specific rules and constraints.
Create DTO
They define the structure of incoming data when creating a resource. This helps validate and format the data before it's processed.
export class CreateProductDto {
  name: string;
  description: string;
  category: string;
  price: number;
  image: string;
}
Update DTO
They specify the allowed fields for updating a resource, ensuring that only valid data can be modified, enhancing data integrity and security.
import { PartialType } from '@nestjs/mapped-types';
import { CreateProductDto } from './create-product.dto';

export class UpdateProductDto extends PartialType(CreateProductDto) {
  id: number;
}
Controller
Controllers are un charge of receiving incoming requests and responding to the client. The main purpose of a controller is to receive particular requests for the application. Each controller frequently has more than one route, and distinct routes might perform various actions.
Let's now see what our product controller looks like.
import { Controller, Get, Post, Body, Patch, Param, Delete } from '@nestjs/common';
import { ProductsService } from './products.service';
import { CreateProductDto } from './dto/create-product.dto';
import { UpdateProductDto } from './dto/update-product.dto';

@Controller('products')
export class ProductsController {
  constructor(private readonly productsService: ProductsService) {
  }

  @Post()
  create(@Body() createProductDto: CreateProductDto) {
    return this.productsService.create(createProductDto);
  }

  @Get()
  findAll() {
    return this.productsService.findAll();
  }

  @Get(':id')
  findOne(@Param('id') id: string) {
    return this.productsService.findOne(+id);
  }

  @Patch(':id')
  update(@Param('id') id: string, @Body() updateProductDto: UpdateProductDto) {
    return this.productsService.update(+id, updateProductDto);
  }

  @Delete(':id')
  remove(@Param('id') id: string) {
    return this.productsService.remove(+id);
  }
}
The first thing we note is that NestJS makes extensive use of decorators. The @Controller() decorator is used to
indicate that a class is a controller. In the above example, we utilized the @Controller() decorator, which is
required to construct a basic controller with a parameter products which represents the route path. Please notice that
if you do not provide any value in the parameter, the controller will be accessible from the host with no need to
provide any pathname
Routing
@Get(), @Post(), @Delete(), and @Put() HTTP request method before the controller class methods tells NestJS
creating a handler for the equivalent endpoint for Http requests. The endpoint corresponds to the HTTP request method
and the route path.
Body request and Query Param
We need to access the content of a request when handling POST and PUT in the controller above. NestJS includes
a @Body() decorator that allows us to easily access the Http request body. We previously introduced the concept of a
Data Transfer Object (DTO). It helps to control and validate data when creating or updating resources.
Meanwhile, we should notice the @Param('id') decorator which is used to tell NestJS that our path has a query
parameter named id, and should be provided when the request is sent.
Module
A module is a class that has been annotated with the @Module() decorator. Nest uses the metadata provided by the
@Module() decorator to organize the application structure.
Each application contains at least one module, known as the root module. Nest builds the application graph from the root module, which is the internal data structure Nest utilizes to resolve module and provider interactions and dependencies. While very small programs may theoretically contain only the root module, this is not the norm.
Lets what the product module looks like:
import { Module } from '@nestjs/common';
import { ProductsService } from './products.service';
import { ProductsController } from './products.controller';

@Module({
  controllers: [ProductsController],
  providers: [ProductsService],
})
export class ProductsModule {
}
The @Module() decorator takes a single object whose properties describe the module:
- controllers: the set of controllers defined in this module which have to be instantiated
- providers: the providers that will be instantiated by the Nest injector and that may be shared at least across this module
- imports: the list of imported modules that export the providers which are required in this module
- exports: he subset of providers that are provided by this module and should be available in other modules which import this module.
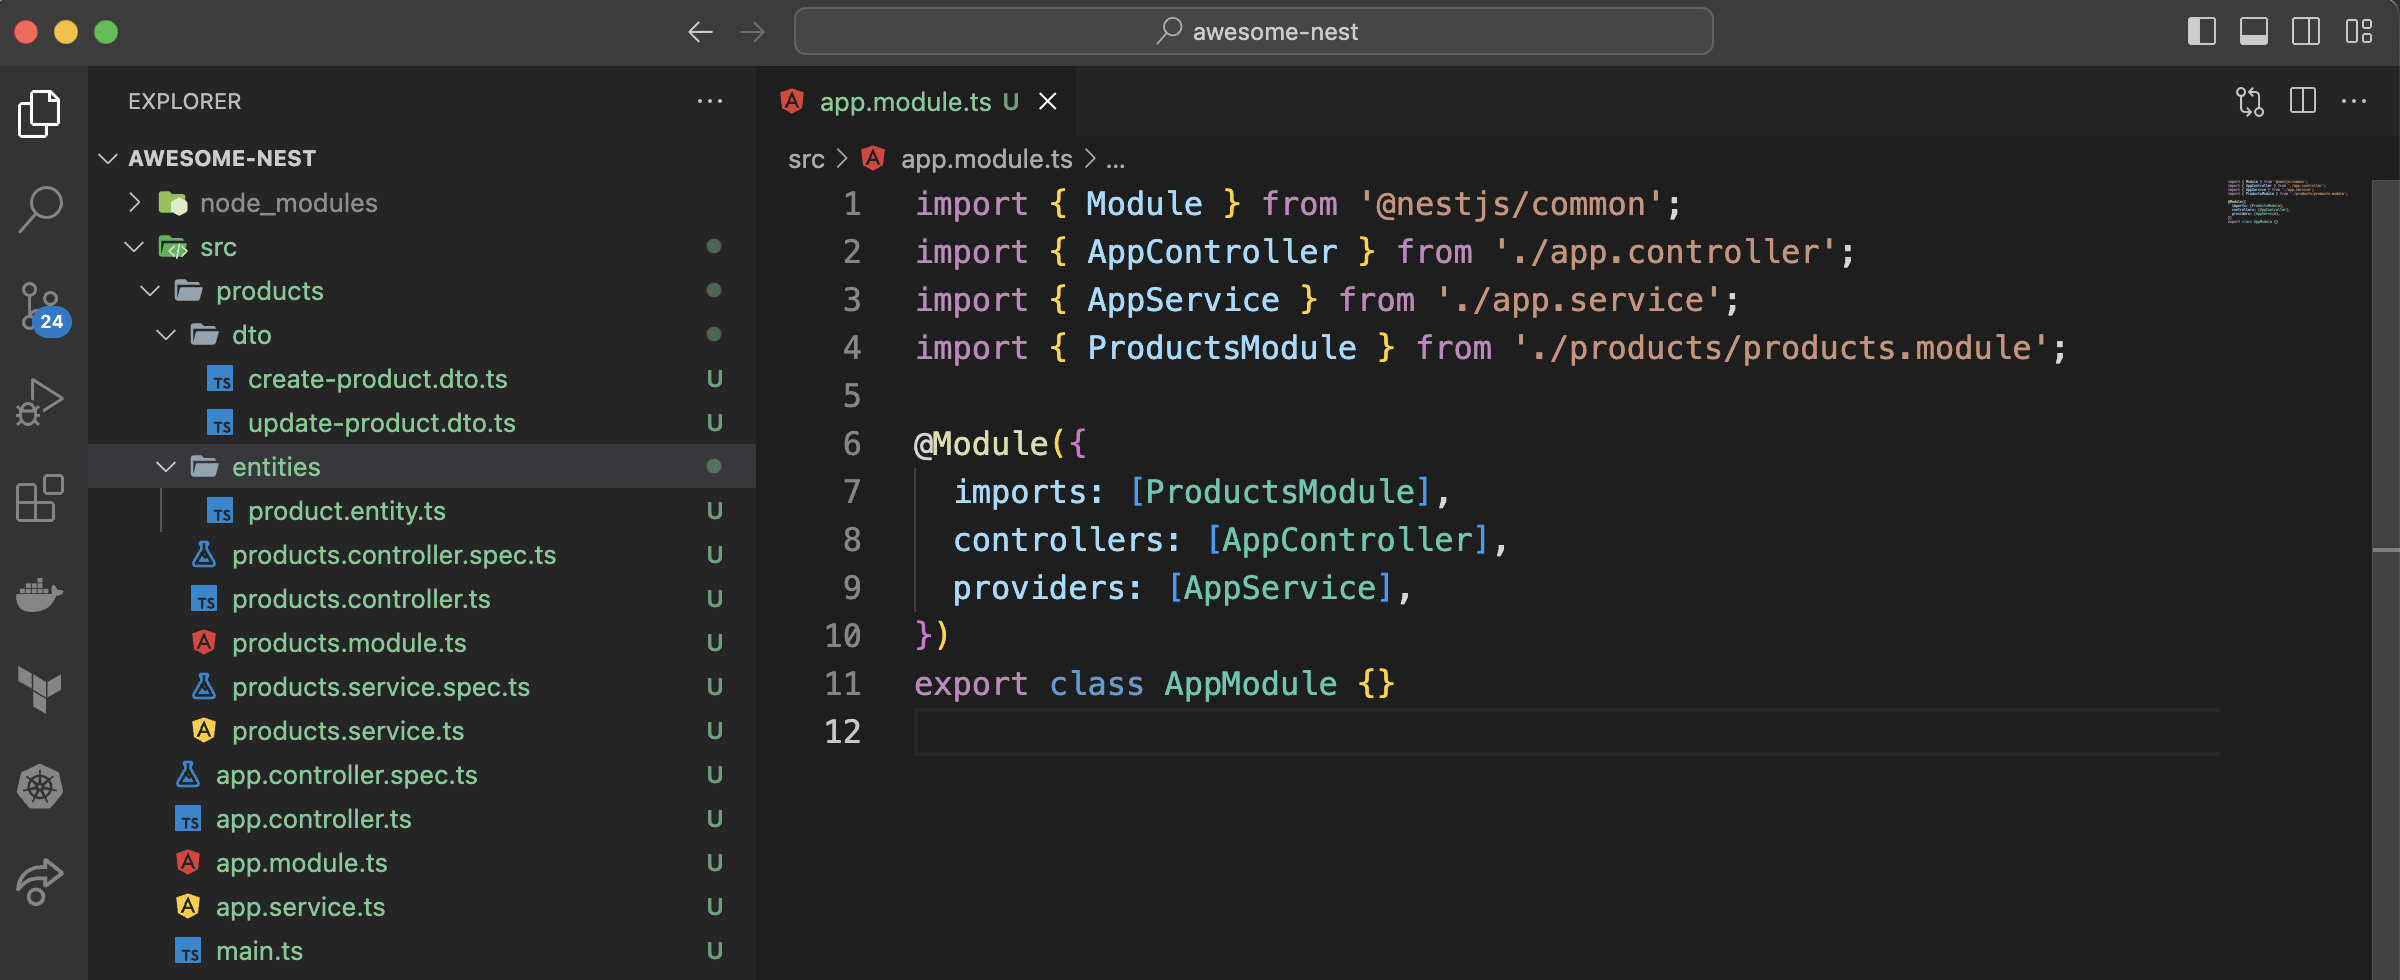
Finally, let's take a look at the app.module.ts file:
import { Module } from '@nestjs/common';
import { AppController } from './app.controller';
import { AppService } from './app.service';
import { ProductsModule } from './products/products.module';

@Module({
  imports: [ProductsModule],
  controllers: [AppController],
  providers: [AppService],
})
export class AppModule {
}
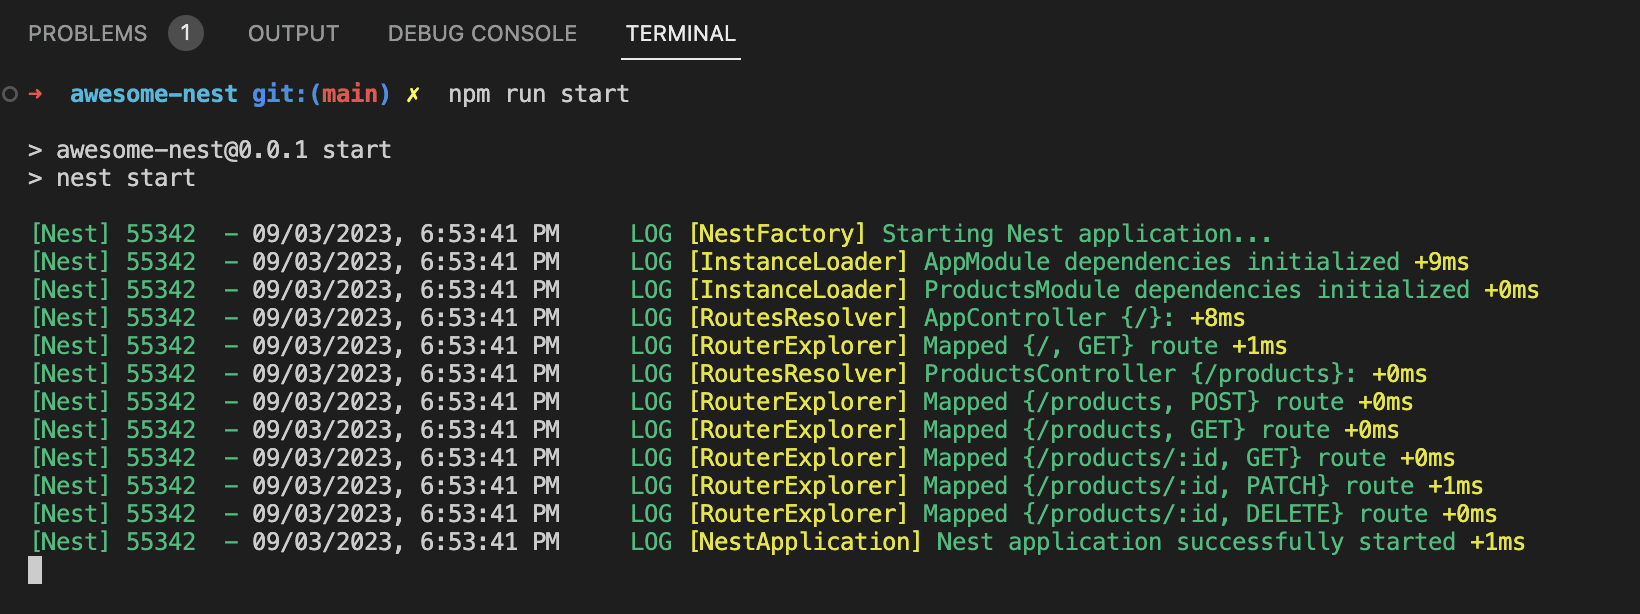
Now, what else? Maybe start the dev server? Sure! Here is how to start
Here we are, everything is now allowing you to manage a small CRUD of products for an e-commerce site catalog. I share
the postman collection with you to test endpoints in your environment.

Summary
We've just scratched the surface of NestJs in this essay. We now understand what a Controller is and how to manage basic routing in our application. We've also briefly discussed Services and Modules. In the following sections of this series, we will spend a significant amount of time studying the application structure in NestJS.
All the information presented above is only the top of the NestJS iceberg. Hopefully, it has persuaded you that it is worthwhile to investigate this framework because it offers a lot of value. There's a lot to say about Nest's features, such as clean error handling and dependency injection. We'll also go over the PostgresSQL database and how to use it using ORM, and of course we will talk about authentication and authorization with NestJS.
Stay tuned !!
Subscribe to future posts
Get future posts in your inbox. No spam, unsubscribe any time.
Related posts
Mastering NestJS: Unlocking the Power of Relationships with TypeORM and SQL Databases
Unlock the Power of Data Relationships with NestJS, TypeORM, and SQL Databases. Master the art of building complex data structures and seamless interactions. Ideal for both seasoned NestJS developers and beginners looking to create cutting-edge apps
October 18, 2023
Mastering NestJS: Connecting NestJs to PostgreSQL Database
Learn the Essential Steps to Master NestJS and Leverage TypeORM for Robust Database Connectivity in Your Projects.
September 6, 2023
Mastering NestJS: Your Ultimate Guide to Modern Backend Development
Explore NestJS, a modern Node.js framework, in this comprehensive introduction. Join our series to master modular architecture, controllers, providers, services, and more. Build scalable backend applications with confidence. Welcome to Part 1 of the NestJS Series!
August 23, 2023